Download Accelerator in Linux and Windows

I find opensource download manager that can daplikasikan in all types of operating systems that use the Mozilla Firefox browser, I try the application on Linux and Windows, that can run smoothly. Download Them All


Add a program on Mozilla Firefox which can be applied in all OS. The file is quite small-about 500 KB.

Installation

Step is very simple:

1. Go to site DownloadThemAll
2. Click Add To Firefoxaddon

addon
3. Then you restart Firefox

If in step-2, could not be done means that you do not support Firefox to install this Add On. Possible old version of firefox.

For the windows solution:

1. Uninstall Firefox
2. Download the latest Firefox
3. Install the new Firefox download
4. Repeat the above installation DownloadThemAll

For the Ubuntu Linux is actually the same in Windows, but of course different command.

1. Uninstall Firefox, use the command:
sudo apt-get uninstall firefox
2. Download the latest Firefox select the Linux OS
3. Extract the file with right click -> Here Extact
4. Then we copy the file to ektrak /usr/lib with the following steps,
5. firefox right-click the folder -> copy
6. Alt and press F2 at the same time for running the program mengeluar
Type:
gksudo nautilus /usr/lib
and enter the admin password is
right click -> paste

start


7. The next step is to make the icons start the program, the following manner:
Right-click on the start menu -> select edit menus

start


select applications -> internet -> and click on the new Item

menu


menu

Type the name Mozilla Firefox, type in the command /usr/lib/firefox/firefox
To change the icon, click the icon -> and enter /usr/lib/firefox/icons, select the icon for the desired ago ok
After I finished Strat menu click ok


8. To menjalakan firefox click start -> Internet -> Mozilla Firefox
9. Repeat the above installation DownloadThemAll
10. Restart your firefox

How to Use

To use, you use more easily DownloadThemAll with the Manager of ways:

In Mozilla Firefox click Tools -> DownThemAll! Tools -> Manager

The result:

download


download


Clear Squid Directory

>>>> Just delete the cache directory and its log is:)
>> The mananya ya mas? at all because I mudeng. :)
> I usually in /var/spool/squid ...

Usually I do to minimize downtime
1. squid stop
# /etc/init.d/squid3 stop

2. rename the cache directory
# mv / var/spool/squid3 / var/spool/squid3.BAK

3. create a new directory for the cache
# mkdir / var/spool/squid3

4. Change owner
# chown proxy.proxy / var/spool/squid3

5. Turn on more squid
# /etc/init.d/squid3 start

6. Nah .. new delete the old cache directory
#rm -rf /var/spool/squid3.bak

What if the first delete the directory, the old .. The contents of the directory
is so big, so I delete
recursif the old files.

Site Map

Make Personal Website with Wordpress
Driver Toshiba Portege 4010
Simple Step to Make Joomla Website
Bad check sum (CMOS) on Toshiba
How to refill catridge canon (830, 831,40,41)
Zyrex D4F Driver
Sharing printer with CUPS and Samba
Combine Two Internet Provider with Mikrotik Router...
Install Flash Player 10.0 in Ubuntu 8.04
Driver Epson Stylus C45
Dell Latitude C610 Configuration Diagnostic

Make Personal Website with Wordpress

1. Buy paid hosting 

Hosting paying more secure, because we do not worry we are hosting hosting removed by the host master. Now hosting is very cheap even from $5 , - per year. 

2. Login to cPanel 
After we list our domain hosting, we will get a username and password from cPanel. To login type www.yourdomain.com / CPANEL in the browser address bar, enter the username and password. 

3. Use Fantastico 
In CPANEL, there are already programs to install the CMS (Content Management System) with Fantastico. Click Fantastico, and then click search wordpress install, we are prompted to enter the same username password to log in to do us. 

4. How WordPress Login 
After the install is complete, to login to wordpress type www.yourdomain.com/wp-admin, after that we enter the username and password wordpress (remember different username with the password wordpress CPANEL). 

5. Posting on WordPress 
To start posting click Posts, and Add New, type in our article and click Publish.

Driver Toshiba Portege 4010

Series :
- Toshiba Portege 4010

Problem:
- Not detect hardware sound, vga, wireless driver, modem

Solution :
- Download driver in this link http://eu.computers.toshiba-europe.com …

Solution detail :

Download driver link:
http://eu.computers.toshiba-europe.com …

Portégé 4010 PIII-M 933 MHz/XP…


Switch model::

Portégé 4010 PIII-M 933 MHz/XP…
Part Number : PP401E-1FCDF-G3 
Key Features
- Ultra-portability without compromise- Fully integrated wireless communication capability for ultimate mobile freedom- Innovative and eye-catching design creates a memorable impression- Long battery life for maximum independence- Enhanced expansion options guarantee greater compatibility

Simple Step to Make Joomla Website


1. Download joomla, from joomla.org 

joomla is a CMS that allows you to create a website, after installing joomla in your hosting, then the withdrawal will be working joomla blog. Later we consider the steps. 

2. Download filezilla 

FTP-based program will be easier for you to transfer data from your computer to your hosting server. You can download the filezilla-project.org. then install on your computer. 

3. Sign up and get your hosting 

Submit your hosting to hosting with the commercial register eg (www.kerajaanweb.com) or you can register on the free hosting, for example phpnet.us after that you will get: 
- Address of your domain: eg yourdomain.com or yourdomain.phpnet.us 
- Username and password CPANEL 
- Mysql host 
- Mysql password 
- Ftp server
- ftp username dan password 

3. Upload-joomla is the master data with the program to filezilla server hosting your 

ftp server and enter your username and password
upload joomla master program to server

4. CPanel and open and ekstract joomla 

enter to the CPANEL write the address in the browser address bar eg http://yourdomain.com/cpanel, then enter CPANEL username and password, and you will goto filemanager and ekstract joomla 

5. Install joomla 

To install joomla on your server, goto your address in your browser, eg yourdomain.com, during the install we will be asked to enter our Website Title mysql host, mysql username, password mysql, ftp server, ftp ftp username and password. joomla your password 

6. Delete installation folder joomla 

Re-entry to the CPANEL hosting as in the no 4, delete the folder installation 

7. Log in to joomla 

Go to joomla type in the browser eg www.yourdomain.com/administrator, enter your joomla admin username and password 

8. start posting 

poting click to start the new article in joomla

Bad check sum (CMOS) on Toshiba


Series: 
- Toshiba Portege 4010 

Problems: 
- A message appears 
*** Bad check sum (CMOS) *** 
Check system. Then press [F1] key. 
every computer switched on 
- Capslock key, Ctrl, F1 not working 

Damage diagnosis: 
- CMOS battery run out, the keyboard is blocking so that the bios can not be fixed unless the service center of Toshiba 


Solutions: 
- Replace CMOS battery 
- Use external keyboard to setup BIOS 

Solution Details: 
I found the problem laptop Toshiba Portage 1040 a message appears: 

*** Bad check sum (CMOS) *** 
Check system. Then press [F1] key. 

When I press F1 in accordance with the instructions, the laptop does not respond. And that message appears continuously every laptop switched on. 
These messages appear because the CMOS battery run out to damage to laptop or laptop not switched on for a long time. 
At first I check the mainboard, if any hardware that does not connect, but does not respond in any way. 

The solution is to use the external keyboard. After I check several forum discussion I try the following steps, and was successful. I try this in the Toshiba Portage 1040 laptop, but can be done in other types of Toshiba laptops as well. Here are the steps: 

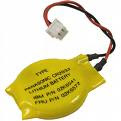
1. Loading your laptop, change the CMOS battery, connect the positive and negative battery with soldering iron, the red cable on the positive and negative in the black cable. The CMOS battery you can get in the shops or computer accessories. 

     
Tutorial how to open a laptop Toshiba Portage 1040 you can follow through this link: 
http://www.irisvista.com/tech/laptops/Toshiba4010/portege4010_1.htm 
To change CMOS battery, you can just follow up to STEP 14 

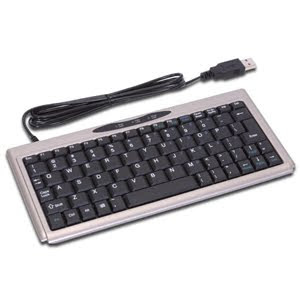
2. Connect your laptop back, attach a USB external keyboard, because the keyboard does not work with Toshiba. 

3. At the time the error message appears 
*** Bad check sum (CMOS) *** 
Check system. Then press [F1] key. 
press F1 through external keyboard, change the system date and time, follow the instructions of edits at the bottom of the screen. Arrow to move the variable you want to change, to change the space variables. PgDown and PgUp to move the page. If you are finished press End and Y to save. 

4. The computer will restart and go directly to your OS. 

5. After entry into the OS that some of the keyboard keys do not work as F1, Ctrl, Capslock, to address them in the windows os, we can use the keyboard on the screen in Start -> All Programs -> Accessories -> Accessibility -> On-Srcreen Keyboard. 
Because the on screen keyboard is really we need to turn off capslock key, we can put it in the start-up windows to fit the way a flame directly.